
CyberArk PVWA Upgrade Guide 2026 | Step-by-Step Password Vault Web Access Upgrade
Learn how to perform a CyberArk PVWA Upgrade with this complete 2026 guide. Covers prerequisites, installation, registration, repair, post-upgrade validation, security hardening, and enterprise best practices for CyberArk PAM Self-Hosted.
Estimated Reading Time: 10 Minutes
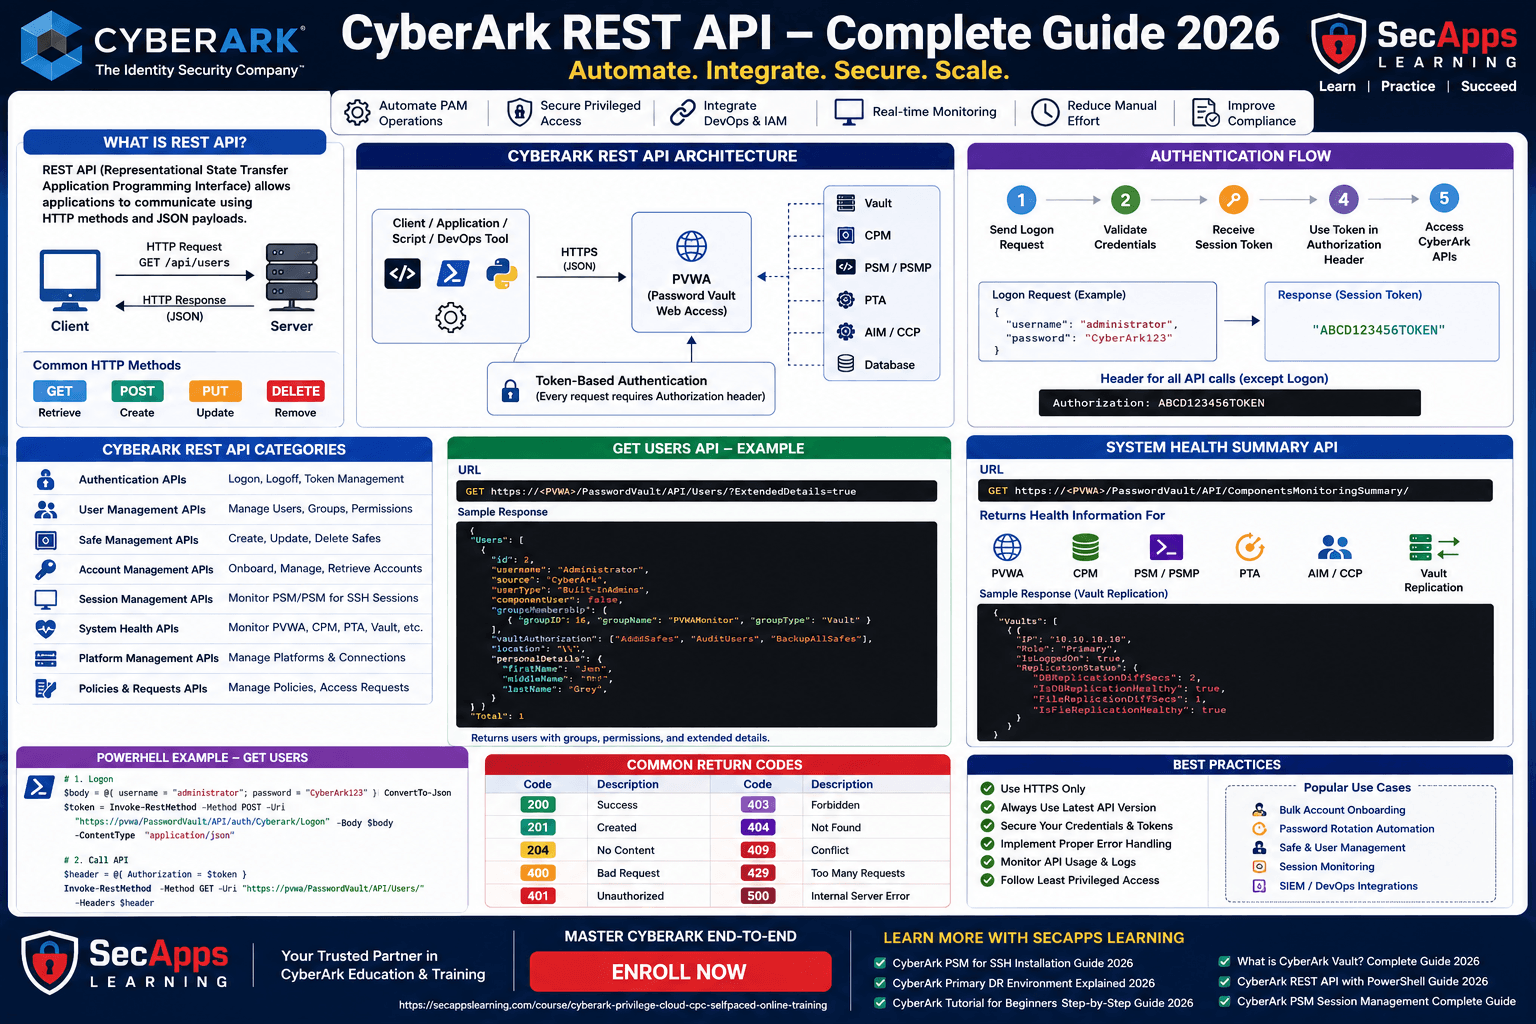
The Password Vault Web Access (PVWA) is one of the most important components of the CyberArk Privileged Access Manager (PAM) Self-Hosted platform. It serves as the primary web interface through which administrators, security teams, application owners, and privileged users securely access managed accounts, launch privileged sessions, retrieve credentials, and perform administrative operations.
Because the PVWA is the primary user interface of the CyberArk ecosystem, upgrading it correctly is critical. An unsuccessful upgrade can impact authentication, privileged session access, API integrations, and administrative workflows.
This article explains the complete CyberArk PVWA Upgrade process based on CyberArk best practices and real-world enterprise implementation experience.
Organizations upgrade the PVWA to:
Adopt the latest CyberArk security enhancements
Receive newly released features
Improve performance and stability
Fix known vulnerabilities
Maintain compatibility with upgraded Vault, CPM, PSM, and other CyberArk components
Stay within CyberArk supported versions
Keeping PVWA updated ensures your PAM environment remains secure, stable, and fully supported.
Unlike older versions where administrators commonly relied on installation wizards, modern CyberArk releases strongly recommend using the PowerShell Automation Scripts included with the installation package.
These scripts reduce manual configuration errors and standardize enterprise deployments.
Before beginning any upgrade, verify that your CyberArk environment is ready.
Start by checking compatibility between all CyberArk components including:
Vault
CPM
PSM
PVWA
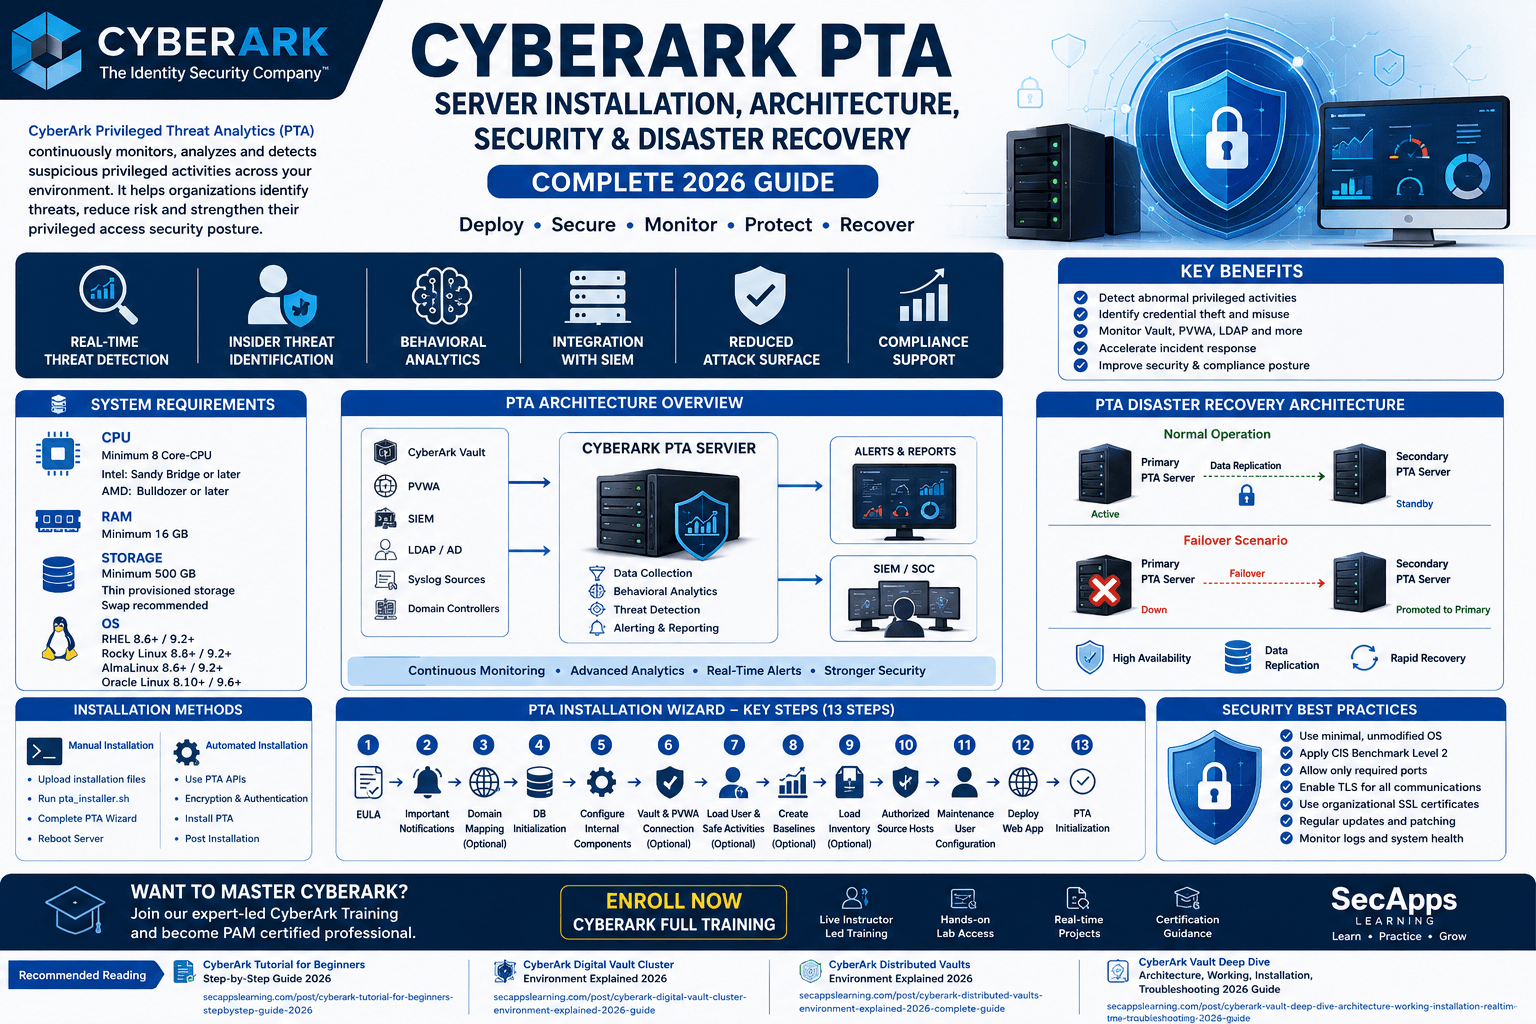
PTA (if applicable)
Identity integrations
External authentication providers
All upgraded components must remain within the supported compatibility matrix.
Next, log in to the Windows server using a local Administrator account and close all running applications to avoid installation conflicts.
CyberArk provides a built-in automation script named:
PVWA_Prerequisites.ps1
This script automatically prepares the server before installation.
It performs tasks including:
Installing required IIS roles
Verifying the installed .NET Framework version
Configuring SSL/TLS
Creating self-signed certificates
Disabling IPv6 (if required)
Configuring IIS settings
The script uses the configuration file:
PVWA_Prerequisites_Config.xml
Administrators may customize this XML file if certain tasks should be skipped.
Running the prerequisites script significantly reduces deployment issues during upgrades.
These roles eliminate the need for manual IIS configuration.
CyberArk supports two upgrade approaches.
The first upgrades the existing PVWA server directly.
The second deploys an entirely new PVWA instance before switching production traffic.
Most enterprises prefer deploying a new instance because it minimizes downtime and simplifies rollback if issues occur.
Before running the installation script, edit:
InstallationConfig.xml
Configure important parameters including:
Username
Company
PVWA Application Directory
Installation Directory
Application Name
Authentication Methods
PVWA URL
Most importantly:
isUpgrade=True
This tells the installer that the environment is being upgraded rather than installed from scratch.
Open an elevated PowerShell window and execute:
PVWAInstallation.ps1
The installation script upgrades the binaries while preserving the existing configuration.
CyberArk recommends using automation scripts instead of manual installation whenever possible.
Installing PVWA is only one part of the process.
After installation, the upgraded server must be connected back to the Vault.
This process is called Registration.
Registration creates the required Vault environment, configures secure communication, and establishes trusted communication between the PVWA and the Vault.
Edit:
PVWARegisterComponentConfig.xml
Update parameters such as:
Vault IP Address
Vault Port
Vault User
Vault Name
Communication Protocol
TLS Version
Authentication Methods
PVWA URL
Installation Directories
Again ensure:
isUpgrade=True
The registration script can securely prompt for the Vault password or accept it as a Secure String, which is the recommended approach.
Run:
PVWARegisterComponent.ps1
Once completed successfully, the upgraded PVWA becomes fully connected to the Vault.
Many enterprise organizations prefer a Blue-Green Deployment strategy.
Instead of modifying the production PVWA directly, administrators:
Install a brand-new PVWA server
Configure prerequisites
Install the new version
Copy required configuration files
Register the new server
Validate functionality
Redirect production traffic
Remove the legacy server
This approach provides minimal downtime while allowing quick rollback if necessary.
Before registering a new instance, copy existing configuration files such as:
web.config
Vault.ini
saml.config
If custom integrations exist, also copy the required DLL files from the application's bin directory.
These files preserve authentication settings and third-party integrations.
Sometimes installations fail because required Vault information was entered incorrectly or the installation was interrupted.
CyberArk includes a built-in Repair Wizard.
The repair process reinstalls all PVWA files while recreating the Vault environment.
Existing Vault users are preserved and are not recreated.
This repair functionality is especially useful when Vault credentials or CPM details were entered incorrectly during installation.
Organizations upgrading from earlier versions should review:
Ignoring these version-specific requirements can result in authentication issues after the upgrade.
Once the upgrade is complete, administrators should verify the environment thoroughly.
CyberArk creates several installation logs inside the Windows temporary directory.
Additional configuration logs are created inside the PVWA configuration folders.
Reviewing these logs helps identify installation warnings before users encounter issues.
Next, verify Windows permissions for directories including:
CredFiles
VaultInfo
Windows Temp
The IIS Application Pool identity must retain Full Control over these locations.
After validating the installation, organizations should perform additional security hardening.
Recommended activities include:
Protect credential files using CreateCredFile
Configure additional authentication methods
Enable API throttling
Configure multiple Vault IP addresses for high availability
Enable Advanced FIPS Cryptography where required
Validate TLS configuration
Review IIS hardening
These steps help ensure the upgraded PVWA aligns with enterprise security standards.
Following a structured upgrade methodology significantly reduces deployment risk and minimizes production downtime.
The CyberArk PVWA upgrade is more than simply replacing application files. It involves preparing the Windows server, validating compatibility, installing prerequisites, upgrading the application, registering it with the Vault, validating authentication, reviewing logs, securing credential files, and performing post-upgrade hardening.
Using the PowerShell automation scripts provided by CyberArk helps standardize deployments and minimizes manual configuration errors, making upgrades faster, safer, and easier to troubleshoot. Whether you choose an in-place upgrade or deploy a new PVWA instance, careful planning and thorough validation are essential to ensuring a successful production rollout.
🎯 Whether you are a CyberArk Engineer, PAM Architect, or Security Consultant, this comprehensive guide explains how real enterprise CyberArk upgrades are planned and executed safely in production environments.
Advance your CyberArk skills with hands-on, enterprise-focused training:
Your email address will not be published. Required fields are marked*
 Explained Architecture, Plugins, Connector Management, Hardening and Complete Credential Rotation Guide (2026).png) July 24 2026
July 24 2026
 July 24 2026
.png) July 17 2026
July 17 2026
 July 16 2026
 July 10 2026
 July 09 2026
July 05 2026
July 09 2026
July 05 2026
 — Complete Vault, DR, Cluster & Distributed Upgrade Handbook-.png) July 03 2026
July 03 2026
 vs Central Credential Provider (CCP) Complete Guide to Installation, Architecture, Licensing, SDKs, ASCP & Best Practices (2026)-.png) July 01 2026
July 01 2026
.png) June 30 2026
June 30 2026
 June 25 2026
 June 24 2026
.png) June 10 2026
June 10 2026
 June 09 2026
 – Complete Architecture, Deployment, HA, DR & Best Practices Guide 2026.png) June 06 2026
June 06 2026
 Certification Guide 2026 by SL.png) June 04 2026
June 04 2026
 Complete Guide 2026 – Identity Protection, Identity Threat Detection, AI-Powered Security Monitoring, Response Playbooks, and ISI Migration.png) June 02 2026
June 02 2026
 May 30 2026
 Complete Guide – Architecture, Security, User Provisioning & Identity Governance.png) May 29 2026
May 29 2026
 Complete Guide – IdentityIQ, Identity Security Cloud (ISC), Certification, Architecture & Career Roadmap.png) May 27 2026
May 27 2026
 Complete Getting Started Guide – Architecture, Configuration & Real-World Implementation.png) May 26 2026
May 26 2026
 – Complete Comparison 2026.png) May 24 2026
May 24 2026
 May 22 2026
 May 21 2026
 vs Privileged Session Manager (PSM) Complete 2026 Guide.png) May 20 2026
May 20 2026
 May 19 2026
.png) May 18 2026
May 18 2026
.png) May 17 2026
May 17 2026
 The Complete Beginner to Advanced Guide to Ethical Hacking.png) May 15 2026
May 15 2026
 May 15 2026
 May 14 2026
 by SecApps Learning.png) May 14 2026
May 14 2026
 May 13 2026
 (1).png) May 12 2026
May 12 2026
.png) May 11 2026
May 11 2026
 May 10 2026
 May 10 2026
 May 08 2026
.png) May 07 2026
May 07 2026
.png) May 06 2026
May 06 2026
.png) May 06 2026
May 06 2026
 Complete Guide (2026).png) May 05 2026
May 05 2026
.png) May 05 2026
May 05 2026
 (1).png) May 04 2026
May 04 2026
.png) May 03 2026
May 03 2026
.png) May 01 2026
May 01 2026
.png) May 01 2026
May 01 2026
.png) April 30 2026
April 30 2026
.png) April 29 2026
April 29 2026
.png) April 28 2026
April 28 2026
.png) April 27 2026
April 27 2026
 System Health, Safe Management, Platform & Master Policy Explained.png) April 26 2026
April 26 2026
 April 20 2026
.png) April 19 2026
April 19 2026
.png) April 17 2026
April 17 2026
.png) April 16 2026
April 16 2026
.png) April 15 2026
April 15 2026
 April 14 2026
 April 10 2026
 April 09 2026
 April 08 2026
 April 07 2026
 July 31 2025
 May 01 2026
 December 26 2024
 December 15 2024
.jpeg) December 08 2024
December 08 2024
 May 01 2026
 October 29 2024
 October 19 2024
 October 15 2024
 October 07 2024
 September 30 2024
 September 23 2024
 September 16 2024
 May 04 2026
 August 27 2024
 August 27 2024
 August 21 2024
 August 19 2024
 May 01 2026
 May 10 2024
 May 08 2024
 May 01 2026
 April 30 2024
.jpg) April 29 2024
April 29 2024
 April 25 2024
 April 22 2024
 April 12 2024
 April 05 2024
 March 30 2024
 May 01 2026
 March 27 2024
 March 27 2024
 March 11 2024
 March 07 2024
 February 29 2024
.jpg) May 01 2026
May 01 2026
 January 24 2024
 January 20 2024
 January 20 2024
 January 20 2024
 January 20 2024
 January 03 2024
 January 03 2024
 January 03 2024
 January 03 2024
Copyright 2022 SecApps Learning. All Right Reserved
Comments ()