.png)
Introduction to CyberArk PSM for SSH
Modern enterprises heavily rely on Linux servers, Unix systems, network devices, cloud infrastructure, and SSH-based administrative access for daily operations. Securing privileged SSH sessions has become one of the most important requirements in cybersecurity and privileged access management.
This is where CyberArk Privileged Session Manager for SSH (PSM for SSH or PSMP) becomes critical.
CyberArk PSM for SSH enables organizations to:
■ Secure privileged SSH access
■ Monitor privileged Unix/Linux sessions
■ Isolate administrators from direct target access
■ Record and audit SSH sessions
■ Enforce least privilege access
■ Prevent credential exposure
■ Centralize SSH access control
PSM for SSH acts as a secure gateway between administrators and target systems.
In this detailed CyberArk PSMP installation guide, we will cover:
■ What is PSM for SSH
■ PSMP architecture
■ Pre-installation tasks
■ Linux package installation
■ Vault registration
■ vault.ini configuration
■ SELinux integration
■ LDAP integration
■ Credential file creation
■ Troubleshooting installation issues
■ PSMP environment in Vault
■ Hardening best practices
■ Uninstallation process
■ Real-time enterprise scenarios
If you are preparing for:
■ CyberArk implementation projects
■ PAM administration roles
■ CyberArk certifications
■ Linux privileged access management
■ Real-time enterprise deployments
then understanding PSM for SSH installation is extremely important.
You can also explore these advanced CyberArk architecture guides:
■ CyberArk Vault Deep Dive Architecture Guide
■ CyberArk Distributed Vaults Environment Explained
■ CyberArk Digital Vault Cluster Environment Guide
■ CyberArk Tutorial for Beginners
CyberArk Privileged Session Manager for SSH is a Linux-based session management solution that enables organizations to securely manage SSH access to target systems.
Instead of administrators connecting directly to Linux servers, they connect through the PSMP server.
This architecture provides:
■ Session isolation
■ Credential protection
■ Command auditing
■ Session recording
■ Centralized authentication
■ Secure privileged access
Basic Workflow
The workflow is simple but highly secure.
Step 1: User Authentication
The user authenticates through CyberArk.
Step 2: Connection Through PSMP
The SSH session is routed through the PSM for SSH server.
Step 3: Credential Injection
CyberArk injects credentials securely without exposing passwords to end users.
Step 4: Session Monitoring
The session is monitored and optionally recorded.
Step 5: Secure Access to Target
The administrator accesses the Linux or Unix target securely.
| Component | Purpose |
|---|---|
| Vault | Stores privileged credentials |
| PVWA | Web portal access |
| PSMP | SSH session proxy |
| Target Systems | Linux/Unix devices |
| CPM | Password rotation |
| LDAP/Radius | Authentication integration |
Organizations use PSMP because direct SSH access creates multiple security risks.
Common SSH Security Risks
| Risk | Description |
|---|---|
| Shared root passwords | Multiple admins know credentials |
| No auditing | Difficult to track activities |
| Hardcoded SSH keys | Security exposure |
| No session recording | No compliance evidence |
| Privileged misuse | Insider threats |
CyberArk solves these problems using centralized privileged session management.
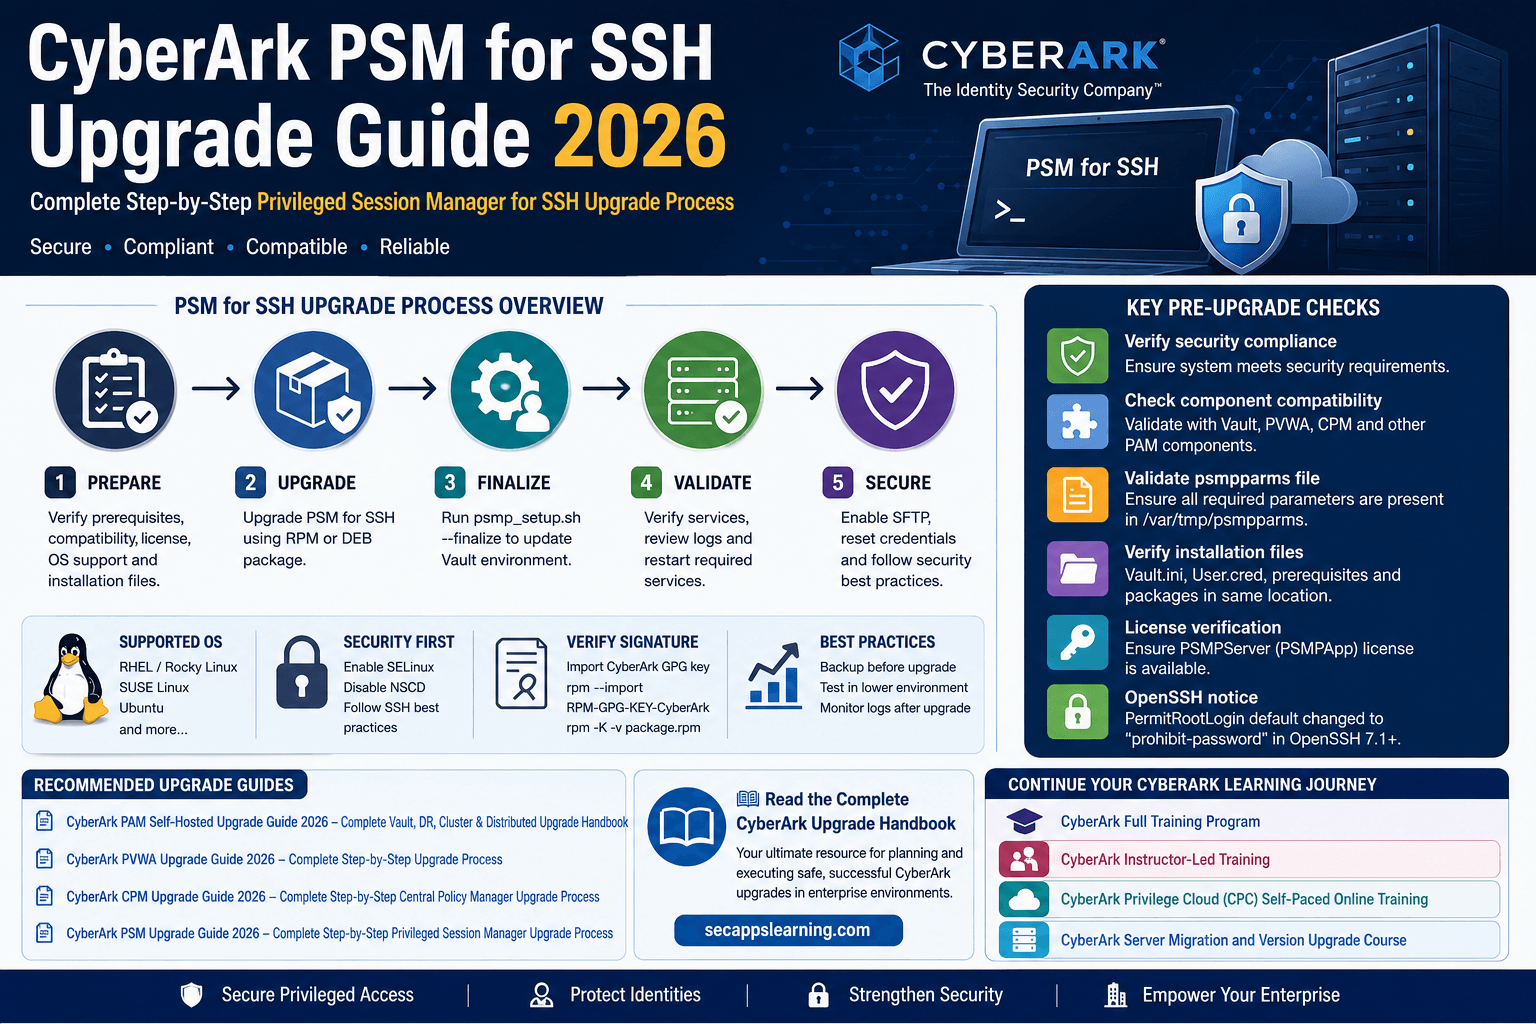
CyberArk installs PSM for SSH in two stages.
Stage 1: Package Installation
The installation package is installed using:
RPM Installation
For:
■ Red Hat
■ Rocky Linux
■ SUSE Linux
DEB Installation
For:
■ Ubuntu
Stage 2: Vault Registration
After package installation:
■ Register PSMP to Vault
■ Configure environment
■ Start PSMP services
Before installation, multiple prerequisites must be validated.
The first step is validating OS compatibility.
CyberArk supports:
| Linux Platform | Supported |
|---|---|
| Red Hat Enterprise Linux | Yes |
| Rocky Linux | Yes |
| SUSE Linux | Yes |
| Ubuntu | Yes |
CyberArk RPM packages are digitally signed.
This protects packages against tampering.
rpm --import RPM-GPG-KEY-CyberArk
rpm -K -v
Verify PAM Component Compatibility
Ensure all CyberArk components are version compatible.
Important components include:
■ Vault
■ PVWA
■ CPM
■ PSM
■ PTA
■ PSMP
Version mismatch can create installation failures.
Your CyberArk license must support PSMP.
The license defines:
| User Type | Interface |
|---|---|
| PSMPServer | PSMPApp |
Without the correct license:
PSM for SSH installation will fail
Optional LDAP Integration
CyberArk supports LDAP integration for:
■ User provisioning
■ Group synchronization
■ Authentication
This simplifies enterprise user management.
The Vault user performing installation must have:
■ Add Safes
■ Audit Users
■ Add/Update Users
■ Manage Server File Categories
The user must also own:
PVWAConfig Safe
with:
■ List accounts
■ Retrieve accounts
■ View owners
■ Manage safe owners
Administrative users are required for:
■ Maintenance
■ Troubleshooting
■ Local administration
These users bypass forwarding to target systems.
CyberArk strongly recommends enabling SELinux before installation.
yum install -y policycoreutils-python-utils
This is mandatory on:
■ Red Hat
■ Rocky Linux
Create Installation Directory
Example:
/opt/CARKpsmp
Copy all installation files into this directory.
Disable NSCD
CyberArk recommends disabling NSCD to avoid caching conflicts.
Stop NSCD
systemctl stop nscd.service nscd.socket
Disable NSCD
systemctl disable nscd.service nscd.socket
Install RPM Package
Installation Command
rpm -i CARKpsmp-..rpm
Sudo Installation
sudo rpm -i CARKpsmp-..rpm
Ubuntu Installation
dpkg -i CARKpsmp-..deb
Verbose Installation
-v
Displays detailed output.
Hash Display
-h
Displays installation progress.
After installation:
Installation process was completed successfully
Purpose of vault.ini
The vault.ini file defines how PSMP communicates with the Vault.
Configure Vault Address
Example:
Address=1.1.1.102
High Availability Configuration
For DR or HA:
Address=1.1.1.102,1.1.1.232
PSMP automatically switches to the next Vault if connectivity fails.
Configure TLS Communication
CyberArk Vault version 14+ supports TLS.
Required Parameters
| Parameter | Value |
|---|---|
| VaultCommunicationProtocol | TLS |
| TLSVersions | TLS_1_2 |
| TLSPort | 443 |
| VaultCertificateStore | Certificate Path |
Use createcredfile utility.
Command Example
/opt/CARKpsmp/bin/createcredfile user.cred
You will be prompted for:
■ Username
■ Password
■ Entropy file usage
After creating credentials:
history -c
to clear shell history.
Run Setup Script
/opt/CARKpsmp/bin/psmp_setup.sh --finalize --vault-ini vault.ini --credfile user.cred
Successful Registration Message
PSM for SSH service instance registered in Vault and enabled
If issues occur, review:
| Log File | Purpose |
|---|---|
| psmp_install.log | Installation activities |
| EnvManager.log | Vault environment creation |
| psmp_setup.log | Setup execution |
| PSMPConsole.log | Runtime logs |
Missing Parameter File
Error
installation parameters file doesn't exist
Solution
Ensure:
/var/tmp/psmpparms
exists.
TCP Port 18923 Already in Use
Problem
Another process uses port 18923.
Solution
Use:
netstat -na
Then modify PSMP port configuration.
Root SSH Access Denied
CyberArk hardening disables remote root password authentication.
Allowed Methods
■ SSH key authentication
■ Maintenance user login
SELinux Connection Error
Example Error
PDKOS106E Failed to connect to the server domain socket
Cause
SELinux enabled after installation.
Solution
Enable PSMP SELinux support properly.
Sometimes PSMP loses Vault connectivity.
Common Causes
■ Network failures
■ Credential sync issues
■ Vault communication failures
Change passwords for:
■ appuser
■ gwuser
■ adbuser
Then recreate credential files.
Example Command for appuser
/opt/CARKpsmp/bin/createcredfile psmpappuser.cred
Verify Services
RHEL8 Service Check
systemctl status psmpsrv-psmpadbserver
Delete Installation Files
Recommended cleanup:
■ user.cred
■ vault.ini
PSMP supports Radius integration for MFA-based authentication.
CyberArk automatically hardens:
■ Red Hat Linux
Manual hardening required for:
■ SUSE Linux
Edit:
sshd_config
Remove # from:
Subsystem sftp /usr/libexec/openssh/sftp-server
Important Directories
| Folder | Purpose |
|---|---|
| /opt/CARKpsmp | Application files |
| /etc/opt/CARKpsmp | Configuration |
| /var/opt/CARKpsmp | Logs and runtime |
CyberArk automatically creates multiple Safes.
PSMPConf
Stores internal PSMP logic files.
PSMPLiveSessions
Stores live session data.
PSMPNotifications
Stores communication files.
PSMPADBUserProfile
Stores user profile configurations.
Users Created
■ PSMPAppUser
■ PSMPGWUser
■ ADBridge Users
Registration Command
/opt/CARKpsmp/bin/envmanager "CreateEnv"
Use unique usernames:
PSMPAppUser_PSMP1
PSMPGWUser_PSMP1
to prevent overwriting installations.
Remove PSMP Environment from Vault
Command
/opt/CARKpsmp/bin/envmanager "TeardownEnv"
RPM Removal
rpm -e CARKpsmp
DEB Removal
dpkg -r carkpsmp
Banking Industry Scenario
A financial organization manages:
■ 5000+ Linux servers
■ Multiple SSH administrators
■ Root-level privileged access
Without PSMP:
■ Shared root passwords existed
■ No session auditing
■ Compliance failures occurred
After CyberArk PSMP deployment:
■ SSH sessions were monitored
■ Credentials were hidden
■ Full auditing enabled
■ MFA integrated
■ Regulatory compliance improved
Recommended Best Practices
■ Use TLS communication with Vault
■ Enable SELinux before installation
■ Use unique PSMP usernames
■ Regularly rotate credentials
■ Integrate MFA authentication
■ Harden Linux operating system
■ Disable unnecessary services
■ Monitor PSMP logs regularly
■ Configure HA Vault addresses
■ Backup vault.ini configuration
CyberArk PSM for SSH is one of the most critical components for securing privileged SSH access in enterprise environments.
It provides:
■ Secure session isolation
■ Credential injection
■ Session monitoring
■ Centralized privileged access
■ Compliance reporting
■ Advanced SSH auditing
Understanding:
■ PSMP installation
■ vault.ini configuration
■ Credential file creation
■ Vault registration
■ SELinux integration
■ Hardening procedures
■ Troubleshooting methods
is essential for every CyberArk engineer and administrator.
As Linux infrastructure continues growing across cloud, DevOps, and enterprise environments, PSM for SSH remains a core security requirement for privileged access management.
Master:
■ CyberArk Vault
■ CPM
■ PSM
■ PSM for SSH
■ DR Architecture
■ Distributed Vaults
■ Linux Integrations
■ Plugin Development
■ Troubleshooting
■ Automation & APIs
through practical implementation-focused training.
Explore more advanced CyberArk guides:
👉 Enroll in CyberArk Full Training Program
Explore more advanced CyberArk guides:
■ CyberArk Vault Deep Dive Guide
■ Distributed Vaults Explained
■ Cluster Vault Architecture Guide
■ CyberArk Beginner Tutorial
Your email address will not be published. Required fields are marked*
.png) July 17 2026
July 17 2026
 July 16 2026
 July 10 2026
 July 09 2026
 July 05 2026
 — Complete Vault, DR, Cluster & Distributed Upgrade Handbook-.png) July 03 2026
July 03 2026
 vs Central Credential Provider (CCP) Complete Guide to Installation, Architecture, Licensing, SDKs, ASCP & Best Practices (2026)-.png) July 01 2026
July 01 2026
.png) June 30 2026
June 30 2026
 June 25 2026
 June 24 2026
.png) June 10 2026
June 10 2026
 June 09 2026
 – Complete Architecture, Deployment, HA, DR & Best Practices Guide 2026.png) June 06 2026
June 06 2026
 Certification Guide 2026 by SL.png) June 04 2026
June 04 2026
 Complete Guide 2026 – Identity Protection, Identity Threat Detection, AI-Powered Security Monitoring, Response Playbooks, and ISI Migration.png) June 02 2026
June 02 2026
 May 30 2026
 Complete Guide – Architecture, Security, User Provisioning & Identity Governance.png) May 29 2026
May 29 2026
 Complete Guide – IdentityIQ, Identity Security Cloud (ISC), Certification, Architecture & Career Roadmap.png) May 27 2026
May 27 2026
 Complete Getting Started Guide – Architecture, Configuration & Real-World Implementation.png) May 26 2026
May 26 2026
 – Complete Comparison 2026.png) May 24 2026
May 24 2026
 May 22 2026
 May 21 2026
 vs Privileged Session Manager (PSM) Complete 2026 Guide.png) May 20 2026
May 20 2026
 May 19 2026
May 18 2026
May 19 2026
May 18 2026
.png) May 17 2026
May 17 2026
 The Complete Beginner to Advanced Guide to Ethical Hacking.png) May 15 2026
May 15 2026
 May 15 2026
 May 14 2026
 by SecApps Learning.png) May 14 2026
May 14 2026
 May 13 2026
 (1).png) May 12 2026
May 12 2026
.png) May 11 2026
May 11 2026
 May 10 2026
 May 10 2026
 May 08 2026
.png) May 07 2026
May 07 2026
.png) May 06 2026
May 06 2026
.png) May 06 2026
May 06 2026
 Complete Guide (2026).png) May 05 2026
May 05 2026
.png) May 05 2026
May 05 2026
 (1).png) May 04 2026
May 04 2026
.png) May 03 2026
May 03 2026
.png) May 01 2026
May 01 2026
.png) May 01 2026
May 01 2026
.png) April 30 2026
April 30 2026
.png) April 29 2026
April 29 2026
.png) April 28 2026
April 28 2026
.png) April 27 2026
April 27 2026
 System Health, Safe Management, Platform & Master Policy Explained.png) April 26 2026
April 26 2026
 April 20 2026
.png) April 19 2026
April 19 2026
.png) April 17 2026
April 17 2026
.png) April 16 2026
April 16 2026
.png) April 15 2026
April 15 2026
 April 14 2026
 April 10 2026
 April 09 2026
 April 08 2026
 April 07 2026
 July 31 2025
 May 01 2026
 December 26 2024
 December 15 2024
.jpeg) December 08 2024
December 08 2024
 May 01 2026
 October 29 2024
 October 19 2024
 October 15 2024
 October 07 2024
 September 30 2024
 September 23 2024
 September 16 2024
 May 04 2026
 August 27 2024
 August 27 2024
 August 21 2024
 August 19 2024
 May 01 2026
 May 10 2024
 May 08 2024
 May 01 2026
 April 30 2024
.jpg) April 29 2024
April 29 2024
 April 25 2024
 April 22 2024
 April 12 2024
 April 05 2024
 March 30 2024
 May 01 2026
 March 27 2024
 March 27 2024
 March 11 2024
 March 07 2024
 February 29 2024
.jpg) May 01 2026
May 01 2026
 January 24 2024
 January 20 2024
 January 20 2024
 January 20 2024
 January 20 2024
 January 03 2024
 January 03 2024
 January 03 2024
 January 03 2024
Copyright 2022 SecApps Learning. All Right Reserved
Comments ()