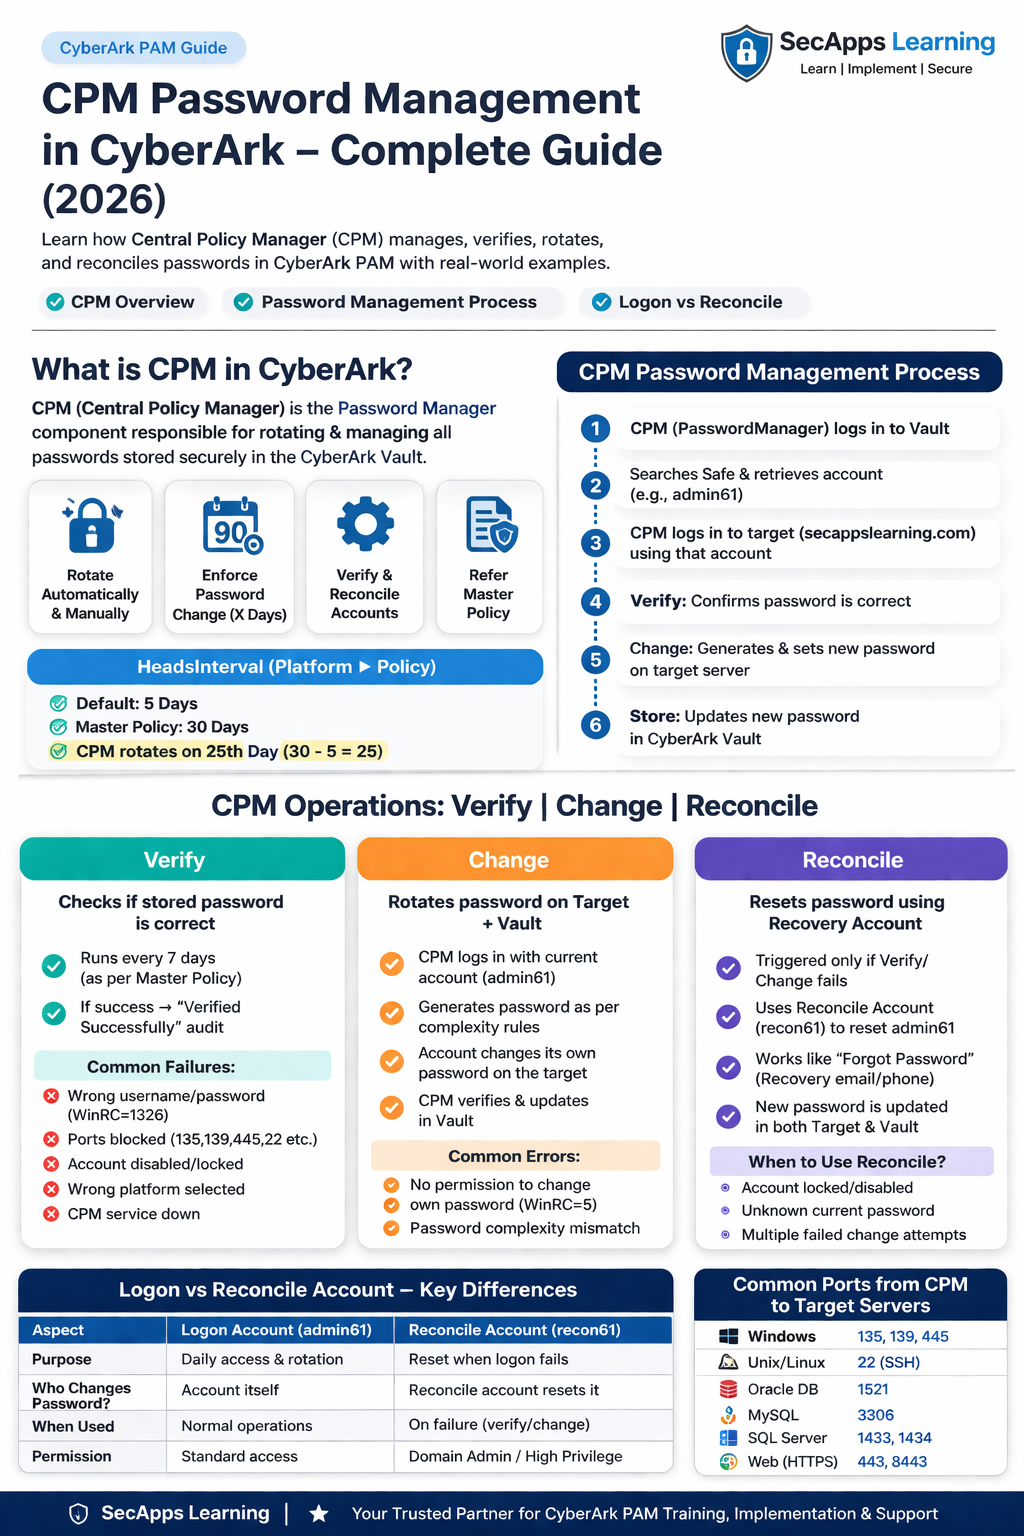
.png)
Learn how to use CyberArk REST API with PowerShell to automate account onboarding, safe creation, and password management. Step-by-step guide with script.
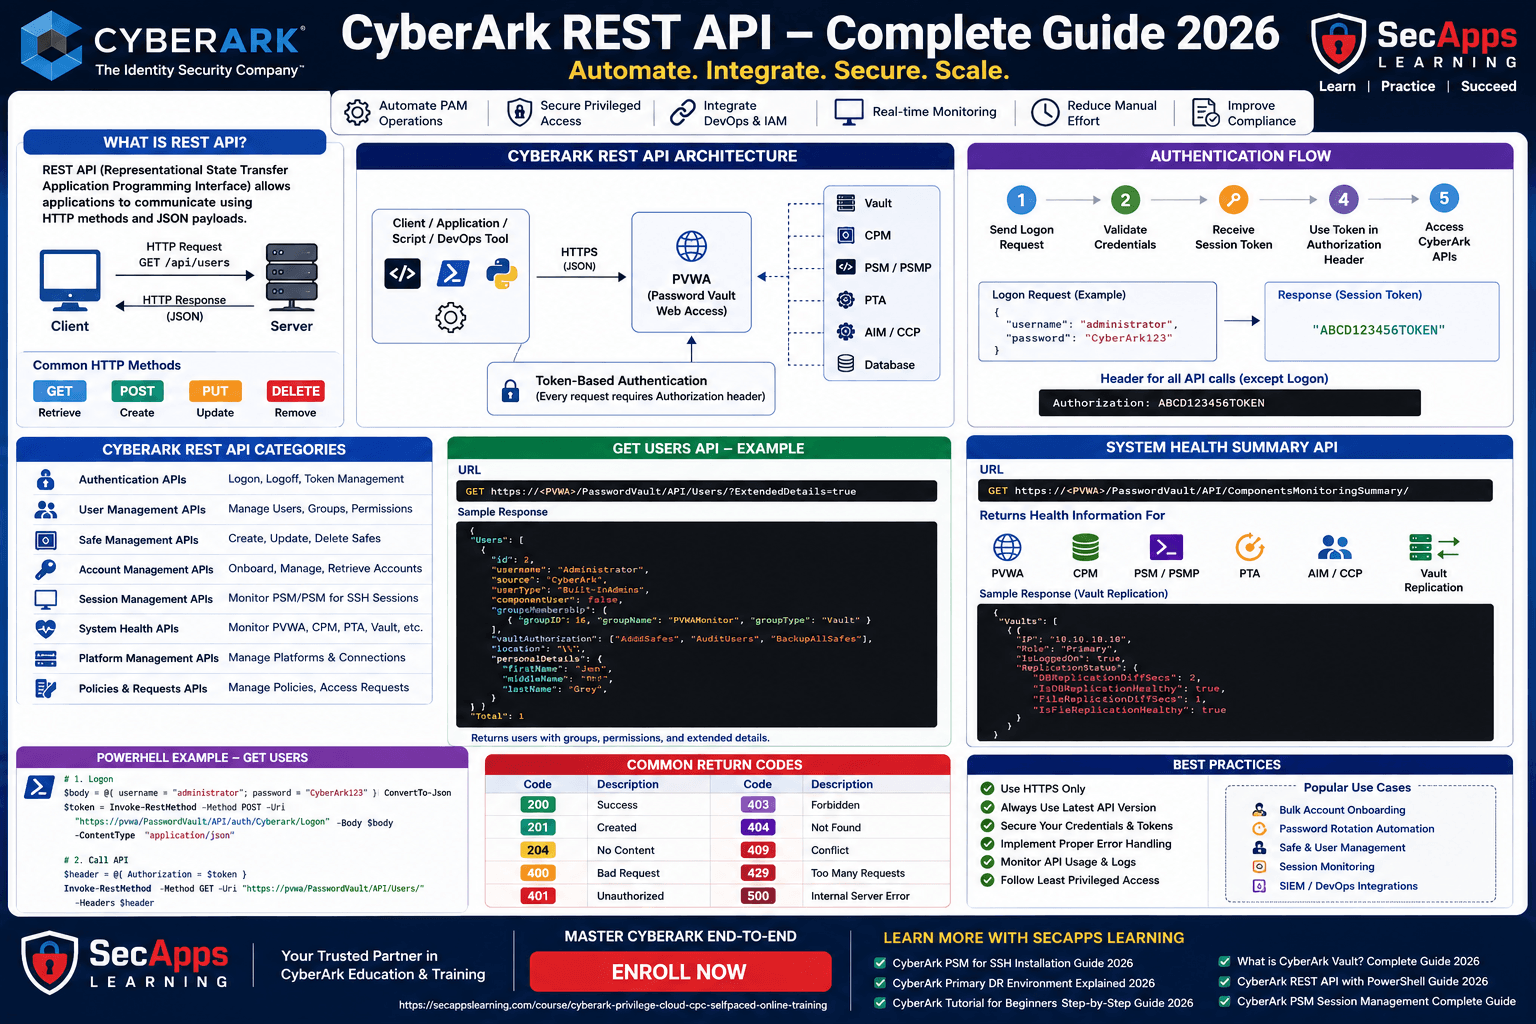
A REST API (Representational State Transfer – Application Programming Interface) allows applications to communicate over HTTPS.
👉 In simple terms:
It acts as a bridge between two systems to exchange data securely.
Imagine:
You want to update your status on Facebook automatically
Instead of manual login, you use a script
👉 That script connects using APIs provided by the application
Applications like:
AWS
Azure etc.
👉 Provide APIs for automation
Similarly, CyberArk provides APIs for:
✔ Account onboarding
✔ Safe creation
✔ Password rotation
✔ User management
✔ Reporting etc.
👉 You can view all APIs using Swagger:
https://PVWA/PasswordVault/Swagger
👉 This provides:
API list
Request format
Response structure
✔ Automate repetitive tasks
✔ Reduce manual effort
✔ Improve accuracy
✔ Enable bulk operations
✔ Integrate with external tools
👉 Onboard 1000 accounts automatically
👉 Instead of manual onboarding
👉 PowerShell is a scripting language used to:
✔ Automate OS-level tasks
✔ Call APIs
✔ Integrate systems
👉 Onboard 1000 accounts or more into CyberArk
Create a CSV file:
userName,address,safeName,platformID,secret
admin1,server1,Windows-Safe,WinDomain,Pass@123
admin2,server2,Unix-Safe,UnixSSH,Pass@456
👉 Save at:
C:\Users\Administrator\Desktop\Accounts.csv
https://PVWAURL/PasswordVault/API/auth/Cyberark/Logon
https://PVWAURL/PasswordVault/API/Accounts
https://PVWAURL/PasswordVault/API/auth/Logoff
You can use:
✔ CyberArk Authentication
✔ LDAP Authentication
✔ SAML Authentication
👉 Just update API path accordingly
⚠️ Never hardcode password
✔ Use secure input method
👉 Run PowerShell ISE as Administrator
👉 Provide password securely
👉 Script will:
Login
Read CSV
Onboard accounts
Logoff
# ==============================
# CyberArk Account Onboarding Script
# ==============================

# Variables
$PVWAURL = "https://PVWAURL/PasswordVault"
$AuthType = "Cyberark"
$Username = "Administrator"
$CSVPath = "C:\Users\Administrator\Desktop\Accounts.csv"

# Disable SSL warnings (if needed)
Add-Type @"
using System.Net;
using System.Security.Cryptography.X509Certificates;
public class TrustAllCertsPolicy : ICertificatePolicy {
    public bool CheckValidationResult(
        ServicePoint srvPoint, X509Certificate certificate,
        WebRequest request, int certificateProblem) {
        return true;
    }
}
"@
[System.Net.ServicePointManager]::CertificatePolicy = New-Object TrustAllCertsPolicy

# ==============================
# Get Secure Password
# ==============================
$SecurePassword = Read-Host "Enter CyberArk Password" -AsSecureString
$BSTR = [System.Runtime.InteropServices.Marshal]::SecureStringToBSTR($SecurePassword)
$PlainPassword = [System.Runtime.InteropServices.Marshal]::PtrToStringAuto($BSTR)

# ==============================
# Login API
# ==============================
$LogonURL = "$PVWAURL/API/auth/$AuthType/Logon"

try {
    Write-Host "Logging into CyberArk..."

    $Body = @{
        username = $Username
        password = $PlainPassword
    } | ConvertTo-Json

    $Token = Invoke-RestMethod -Uri $LogonURL -Method POST -Body $Body -ContentType "application/json"

    Write-Host "Login Successful!" -ForegroundColor Green
}
catch {
    Write-Host "Login Failed: $_" -ForegroundColor Red
    exit
}

# ==============================
# Read CSV
# ==============================
try {
    $Accounts = Import-Csv -Path $CSVPath
}
catch {
    Write-Host "Failed to read CSV file: $_" -ForegroundColor Red
    exit
}

# ==============================
# Onboard Accounts
# ==============================
$AddAccountURL = "$PVWAURL/API/Accounts"

foreach ($Account in $Accounts) {
    try {
        Write-Host "Onboarding account: $($Account.userName)..."

        $AccountBody = @{
            name = $Account.userName
            address = $Account.address
            userName = $Account.userName
            platformId = $Account.platformID
            safeName = $Account.safeName
            secret = $Account.secret
        } | ConvertTo-Json -Depth 3

        Invoke-RestMethod -Uri $AddAccountURL `
            -Method POST `
            -Headers @{ Authorization = $Token } `
            -Body $AccountBody `
            -ContentType "application/json"

        Write-Host "Successfully onboarded: $($Account.userName)" -ForegroundColor Green
    }
    catch {
        Write-Host "Failed to onboard $($Account.userName): $_" -ForegroundColor Red
    }
}

# ==============================
# Logoff
# ==============================
$LogoffURL = "$PVWAURL/API/auth/Logoff"

try {
    Invoke-RestMethod -Uri $LogoffURL `
        -Method POST `
        -Headers @{ Authorization = $Token }

    Write-Host "Logged off successfully!" -ForegroundColor Green
}
catch {
    Write-Host "Logoff Failed: $_" -ForegroundColor Red
}
👉 Uses API to authenticate
👉 Returns session token
👉 Reads account details
👉 Loop through each account
👉 Calls API to create account
👉 Ends session securely
✔ Never hardcode passwords
✔ Use secure string input
✔ Use try-catch for error handling
✔ Validate CSV before execution
✔ Test in lower environment first
👉 Wrong credentials / Auth type
👉 Wrong endpoint / URL
👉 Missing Safe / Platform
👉 Certificate validation problem
CyberArk REST API is a game-changer for automation
👉 Manual work → Automated workflows
👉 Time-consuming → Efficient
💡 If you master this → You move from Admin → Automation Engineer
Your email address will not be published. Required fields are marked*
.png) July 17 2026
July 17 2026
 July 16 2026
 July 10 2026
 July 09 2026
 July 05 2026
 — Complete Vault, DR, Cluster & Distributed Upgrade Handbook-.png) July 03 2026
July 03 2026
 vs Central Credential Provider (CCP) Complete Guide to Installation, Architecture, Licensing, SDKs, ASCP & Best Practices (2026)-.png) July 01 2026
July 01 2026
.png) June 30 2026
June 30 2026
 June 25 2026
 June 24 2026
.png) June 10 2026
June 10 2026
 June 09 2026
 – Complete Architecture, Deployment, HA, DR & Best Practices Guide 2026.png) June 06 2026
June 06 2026
 Certification Guide 2026 by SL.png) June 04 2026
June 04 2026
 Complete Guide 2026 – Identity Protection, Identity Threat Detection, AI-Powered Security Monitoring, Response Playbooks, and ISI Migration.png) June 02 2026
June 02 2026
 May 30 2026
 Complete Guide – Architecture, Security, User Provisioning & Identity Governance.png) May 29 2026
May 29 2026
 Complete Guide – IdentityIQ, Identity Security Cloud (ISC), Certification, Architecture & Career Roadmap.png) May 27 2026
May 27 2026
 Complete Getting Started Guide – Architecture, Configuration & Real-World Implementation.png) May 26 2026
May 26 2026
 – Complete Comparison 2026.png) May 24 2026
May 24 2026
 May 22 2026
 May 21 2026
 vs Privileged Session Manager (PSM) Complete 2026 Guide.png) May 20 2026
May 20 2026
 May 19 2026
.png) May 18 2026
May 18 2026
.png) May 17 2026
May 17 2026
 The Complete Beginner to Advanced Guide to Ethical Hacking.png) May 15 2026
May 15 2026
 May 15 2026
 May 14 2026
 by SecApps Learning.png) May 14 2026
May 14 2026
 May 13 2026
 (1).png) May 12 2026
May 12 2026
.png) May 11 2026
May 11 2026
 May 10 2026
 May 10 2026
 May 08 2026
.png) May 07 2026
May 07 2026
.png) May 06 2026
May 06 2026
.png) May 06 2026
May 06 2026
 Complete Guide (2026).png) May 05 2026
May 05 2026
.png) May 05 2026
May 05 2026
 (1).png) May 04 2026
May 04 2026
.png) May 03 2026
May 03 2026
.png) May 01 2026
May 01 2026
.png) May 01 2026
May 01 2026
.png) April 30 2026
April 30 2026
.png) April 29 2026
April 28 2026
April 29 2026
April 28 2026
.png) April 27 2026
April 27 2026
 System Health, Safe Management, Platform & Master Policy Explained.png) April 26 2026
April 26 2026
 April 20 2026
.png) April 19 2026
April 19 2026
.png) April 17 2026
April 17 2026
.png) April 16 2026
April 16 2026
.png) April 15 2026
April 15 2026
 April 14 2026
 April 10 2026
 April 09 2026
 April 08 2026
 April 07 2026
 July 31 2025
 May 01 2026
 December 26 2024
 December 15 2024
.jpeg) December 08 2024
December 08 2024
 May 01 2026
 October 29 2024
 October 19 2024
 October 15 2024
 October 07 2024
 September 30 2024
 September 23 2024
 September 16 2024
 May 04 2026
 August 27 2024
 August 27 2024
 August 21 2024
 August 19 2024
 May 01 2026
 May 10 2024
 May 08 2024
 May 01 2026
 April 30 2024
.jpg) April 29 2024
April 29 2024
 April 25 2024
 April 22 2024
 April 12 2024
 April 05 2024
 March 30 2024
 May 01 2026
 March 27 2024
 March 27 2024
 March 11 2024
 March 07 2024
 February 29 2024
.jpg) May 01 2026
May 01 2026
 January 24 2024
 January 20 2024
 January 20 2024
 January 20 2024
 January 20 2024
 January 03 2024
 January 03 2024
 January 03 2024
 January 03 2024
Copyright 2022 SecApps Learning. All Right Reserved
Comments ()