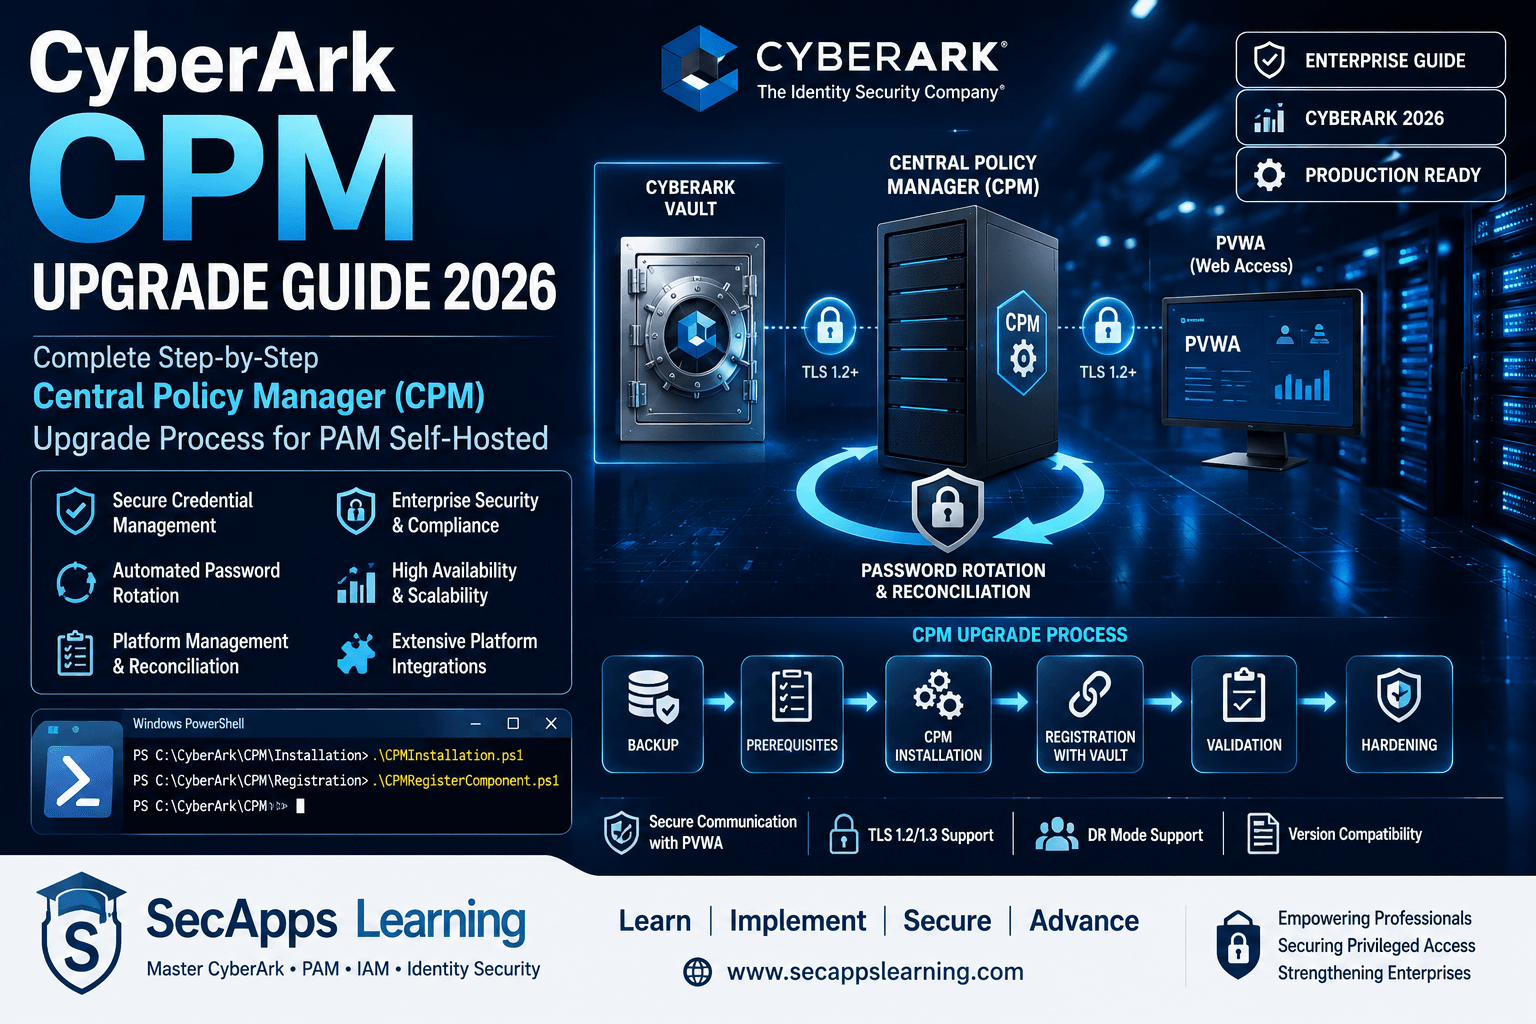
CyberArk CPM Upgrade Guide 2026 | Complete Central Policy Manager Upgrade Process
Estimated Reading Time: 12 Minutes
Learn how to perform a CyberArk CPM Upgrade with this complete 2026 guide. Covers prerequisites, PowerShell automation, registration, secure communication, TLS, repair procedures, validation, post-upgrade tasks, and enterprise best practices.
The CyberArk Central Policy Manager (CPM) is one of the most critical components of the CyberArk Privileged Access Manager (PAM) Self-Hosted platform. While the Vault securely stores privileged credentials and the Password Vault Web Access (PVWA) provides administrative access, the CPM is responsible for automatically changing, verifying, and reconciling passwords across thousands of managed accounts throughout an enterprise.
Because the CPM directly manages privileged credentials, upgrading it requires careful planning. A poorly executed upgrade can interrupt password rotations, break platform integrations, delay password reconciliations, or affect production operations. For this reason, CyberArk recommends following a structured upgrade methodology that includes preparation, automated installation, secure registration, validation, and hardening.
This comprehensive guide walks you through the complete CyberArk CPM Upgrade Process, based on CyberArk best practices and real-world enterprise deployment experience.
Modern organizations continuously upgrade their CyberArk environments to remain secure, supported, and compatible with the latest platform enhancements.
Every new CyberArk release introduces security improvements, enhanced password management capabilities, updated plugins, performance optimizations, improved platform compatibility, and important bug fixes. Running an outdated CPM can expose organizations to operational challenges, unsupported configurations, and compatibility issues with newer versions of the Vault, PVWA, PSM, and external target systems.
A properly planned CPM upgrade ensures uninterrupted password management while maintaining compliance and operational stability.
CyberArk supports upgrading the CPM using either the PowerShell automation scripts included with the installation package or the graphical Installation Wizard. For enterprise environments, CyberArk strongly recommends using the automation scripts because they provide consistency, repeatability, and reduced manual configuration errors.
Before beginning the upgrade, verify that the entire CyberArk environment is ready for the new version.
A successful CPM upgrade always starts with planning rather than installation.
Administrators should review the CyberArk compatibility matrix to ensure that all deployed components—including the Vault, PVWA, PSM, PTA, Identity integrations, and external authentication providers—are supported with the target CPM version.
Running incompatible versions may lead to registration failures, communication problems, or unsupported production configurations.
Compatibility verification should be completed before any production changes are made.
One of CyberArk's most important recommendations is upgrading the Password Vault Web Access (PVWA) before upgrading the CPM.
The newer PVWA versions introduce enhancements that the upgraded CPM expects during registration and secure communication.
If both components are scheduled for maintenance, always complete the PVWA upgrade first.
You can follow our detailed guide here:
CyberArk PVWA Upgrade Guide 2026 – Complete Step-by-Step Upgrade Process
The CPM installation automation requires:
Windows PowerShell Version 5 or Later
Before upgrading, verify the installed PowerShell version by running:
$PSVersionTable.PSVersion
If PowerShell is outdated, update it before continuing with the upgrade.
A production upgrade should never begin without a verified backup.
CyberArk recommends backing up the complete CPM installation directory along with all customized platform configurations stored inside the PasswordManagerShared Safe.
These platform configurations represent years of customization in many organizations and should always be preserved before making any changes.
Modern CyberArk versions require secure communication between the CPM and the PVWA.
This secure communication depends on proper SSL certificate validation.
Before upgrading:
Import the Certificate Authority (CA) certificate that issued the PVWA SSL certificate.
Verify that the CPM server can reach the Certificate Revocation List (CRL) distribution points.
Confirm SSL trust between both servers.
Beginning with CyberArk version 15.0, the validatePVWASecureConnect flag controls certificate validation.
When this parameter is set to true, certificate validation is enforced during installation.
If validation fails, the registration process immediately stops.
Although the parameter can be disabled, this is not recommended for production environments.
The preferred solution is always to resolve the SSL certificate issue and rerun the registration process rather than bypassing validation.
CyberArk requires TLS 1.2 or later for secure communication.
The prerequisite PowerShell script automatically enables TLS support.
Execute:
CPM_PreInstallation.ps1
from an elevated PowerShell session before beginning the installation.
CyberArk provides two supported upgrade methods.
Organizations can use the PowerShell automation scripts or the graphical Installation Wizard.
Large enterprises almost always choose the automated PowerShell approach because it ensures standardized deployments across multiple environments.
Before upgrading, stop the following Windows services:
CyberArk Password Manager

CyberArk Central Policy Manager Scanner
Stopping these services prevents file locking during installation.
Open:
CPM\InstallationAutomation\Installation\InstallationConfig.xml
Update the installation parameters, including:
Username
Company Name
CPM Installation Directory
Most importantly:
isUpgrade=True
This informs the installer that the existing CPM installation should be upgraded rather than creating a new environment.
Run the installation script from an elevated PowerShell window:
CPMInstallation.ps1
The script upgrades both the Central Policy Manager and the Scanner components.
Unlike a fresh installation, the authentication file already used by the CPM to connect with the Vault is preserved during the upgrade.
Organizations operating a Disaster Recovery (DR) CPM should note an important behavior.
During a DR CPM upgrade, the PluginManagerUser account is not automatically created.
Administrators must manually create this account before running the hardening process.
This behavior is expected and does not indicate an installation failure.
After installation completes successfully, the upgraded CPM must reconnect to the Vault.
This process is known as Registration.
Registration establishes secure communication, creates the CPM environment inside the Vault, validates connectivity, and finalizes the upgrade.
Edit:
CPMRegisterComponentConfig.xml
Update all required parameters including:
Vault IP Address
Vault Port
Vault User
Installation Directory
Username
TLS Version
Vault Communication Protocol
Ensure the following parameter is configured:
isUpgrade=True
CyberArk recommends executing:
CPMRegisterComponent.ps1
using a Secure String password rather than supplying passwords in plain text.
After successful registration, the CPM reconnects to the Vault and resumes normal password management activities.
Sometimes upgrades fail because of incorrect Vault credentials, interrupted installations, or missing registration information.
CyberArk provides a built-in Repair Wizard to recreate the CPM environment without recreating existing Vault users.
The repair process reinstalls the CPM binaries while preserving previously created users and credential files.
Beginning with CyberArk version 13.2, a predefined Vault group named PVWAAccountsFeedAdmins is automatically created.
If an existing group already uses this name, administrators should rename the existing group and rerun the repair procedure after upgrading.
Review all release-specific notes before upgrading to avoid unexpected compatibility issues.
Once the CPM upgrade is complete, administrators should validate the installation before returning the environment to production.
Review the installation logs located in the Windows Temp directory.
The primary installation log:
CPMInstall.log
contains detailed information about every installation step and any errors encountered.
Successful completion of the upgrade should also be verified by checking:
CPM Windows Services
Vault Registration
Password Changes
Password Verification
Password Reconciliation
Scanner Functionality
Platform Availability
PVWA Component Health
CyberArk strongly recommends avoiding direct modifications to the default CPM plugins supplied with the product.
If platform customization is required, create separate custom plugins rather than modifying the original files.
This approach simplifies future upgrades and prevents customized files from being overwritten.
Organizations should also regularly download the latest certified platforms from the CyberArk Marketplace to take advantage of updated integrations and security enhancements.
Following a structured enterprise methodology significantly reduces deployment risk while ensuring continuous privileged credential management.
The CyberArk Central Policy Manager is responsible for one of the most security-critical operations in the PAM ecosystem—automatically managing privileged credentials. Because of its importance, upgrading the CPM requires far more than simply replacing binaries. Administrators must validate compatibility, prepare the operating system, establish secure communication with the PVWA, perform the installation, register the component with the Vault, review installation logs, verify password management functionality, and complete post-upgrade hardening.
Using CyberArk's PowerShell automation scripts simplifies the process and reduces manual configuration errors, making upgrades more reliable and repeatable across enterprise environments. Whether you are upgrading a standalone CPM, a Disaster Recovery environment, or a highly available production deployment, following CyberArk best practices ensures a secure and successful upgrade.
🎯 Whether you are a CyberArk Engineer, PAM Architect, or Security Consultant, this comprehensive guide explains how real enterprise CyberArk upgrades are planned and executed safely in production environments.
You may also find this related guide useful:
CyberArk PVWA Upgrade Guide 2026 – Complete Step-by-Step Upgrade Process
Advance your CyberArk skills with hands-on, enterprise-focused training:
CyberArk Full Training Program
CyberArk Instructor-Led Training
Your email address will not be published. Required fields are marked*
 August 28 2026
 July 26 2026
 Explained Architecture, Plugins, Connector Management, Hardening and Complete Credential Rotation Guide (2026).png) July 24 2026
July 24 2026
 July 24 2026
.png) July 17 2026
July 17 2026
 July 16 2026
 July 10 2026
July 09 2026
July 10 2026
July 09 2026
 July 05 2026
 — Complete Vault, DR, Cluster & Distributed Upgrade Handbook-.png) July 03 2026
July 03 2026
 vs Central Credential Provider (CCP) Complete Guide to Installation, Architecture, Licensing, SDKs, ASCP & Best Practices (2026)-.png) July 01 2026
July 01 2026
.png) June 30 2026
June 30 2026
 June 25 2026
 June 24 2026
.png) June 10 2026
June 10 2026
 June 09 2026
 – Complete Architecture, Deployment, HA, DR & Best Practices Guide 2026.png) June 06 2026
June 06 2026
 Certification Guide 2026 by SL.png) June 04 2026
June 04 2026
 Complete Guide 2026 – Identity Protection, Identity Threat Detection, AI-Powered Security Monitoring, Response Playbooks, and ISI Migration.png) June 02 2026
June 02 2026
 May 30 2026
 Complete Guide – Architecture, Security, User Provisioning & Identity Governance.png) May 29 2026
May 29 2026
 Complete Guide – IdentityIQ, Identity Security Cloud (ISC), Certification, Architecture & Career Roadmap.png) May 27 2026
May 27 2026
 Complete Getting Started Guide – Architecture, Configuration & Real-World Implementation.png) May 26 2026
May 26 2026
 – Complete Comparison 2026.png) May 24 2026
May 24 2026
 May 22 2026
 May 21 2026
 vs Privileged Session Manager (PSM) Complete 2026 Guide.png) May 20 2026
May 20 2026
 May 19 2026
.png) May 18 2026
May 18 2026
.png) May 17 2026
May 17 2026
 The Complete Beginner to Advanced Guide to Ethical Hacking.png) May 15 2026
May 15 2026
 May 15 2026
 May 14 2026
 by SecApps Learning.png) May 14 2026
May 14 2026
 May 13 2026
 (1).png) May 12 2026
May 12 2026
.png) May 11 2026
May 11 2026
 May 10 2026
 May 10 2026
 May 08 2026
.png) May 07 2026
May 07 2026
.png) May 06 2026
May 06 2026
.png) May 06 2026
May 06 2026
 Complete Guide (2026).png) May 05 2026
May 05 2026
.png) May 05 2026
May 05 2026
 (1).png) May 04 2026
May 04 2026
.png) May 03 2026
May 03 2026
.png) May 01 2026
May 01 2026
.png) May 01 2026
May 01 2026
.png) April 30 2026
April 30 2026
.png) April 29 2026
April 29 2026
.png) April 28 2026
April 28 2026
.png) April 27 2026
April 27 2026
 System Health, Safe Management, Platform & Master Policy Explained.png) April 26 2026
April 26 2026
 April 20 2026
.png) April 19 2026
April 19 2026
.png) April 17 2026
April 17 2026
.png) April 16 2026
April 16 2026
.png) April 15 2026
April 15 2026
 April 14 2026
 April 10 2026
 April 09 2026
 April 08 2026
 April 07 2026
 July 31 2025
 May 01 2026
 December 26 2024
 December 15 2024
.jpeg) December 08 2024
December 08 2024
 May 01 2026
 October 29 2024
 October 19 2024
 October 15 2024
 October 07 2024
 September 30 2024
 September 23 2024
 September 16 2024
 May 04 2026
 August 27 2024
 August 27 2024
 August 21 2024
 August 19 2024
 May 01 2026
 May 10 2024
 May 08 2024
 May 01 2026
 April 30 2024
.jpg) April 29 2024
April 29 2024
 April 25 2024
 April 22 2024
 April 12 2024
 April 05 2024
 March 30 2024
 May 01 2026
 March 27 2024
 March 27 2024
 March 11 2024
 March 07 2024
 February 29 2024
.jpg) May 01 2026
May 01 2026
 January 24 2024
 January 20 2024
 January 20 2024
 January 20 2024
 January 20 2024
 January 03 2024
 January 03 2024
 January 03 2024
 January 03 2024
Copyright 2022 SecApps Learning. All Right Reserved

Comments ()